
I’ve wanted a DD35 for a while but nobody makes them in N Scale. I loved the big power which the Union Pacific experimented with and used after steam, even if it was a failure! I could kit bash two Atlas GP35s together (that’s what EMD did), but what about trucks? For a while now I’ve been fascinated with the possibilities of 3D printing so this model seemed an obvious start point for drawing and printing my own.
Photos of the DD35s, in both UP and Southern Pacific, are readily available on the web and I started gathering information, although sadly I could not find any engineering drawings. I was able to scale off the specific, length height, wheel centers etc from some clearer photographs which gave me a place to start. You can find some of the images I used here:
In my day job I’m a Structural Engineer, and I use software day in and day out for modeling steel so I’m very at home with 3D modeling on a computer. I used much of the same skills for modeling the shell for the DD35 as I would do for a staircase and to start with I modeled full-size.
There’s a range of softwares available for modeling in 3D from Google SketchUp, which is ideal for both beginners and advanced users, to Autodesk Inventor. SketchUp is free however, and I predominately used SketchUp for this model.
Below are some overall screen shots showing some of the detail that has been put into this model.


This is a correctly-sized shell, all the dimensions match the real thing; right length, width and height. All the details such as fans, doors, lights, handrails, cover plates, etc., are all modeled accurately. Since these shots I have also added the hand brake wheel on one side.
With the shell successfully modeled I need to think about how to power it. I’m going to use the Bachmann DD40AX for the chassis as it’s the closest thing and the new DCC version is very good. Once I’ve scaled my shell down the chassis will be too long, 24mm (0.945”) too long. I’ll talk about that in a later post. The chassis is also thinner than their previous models, but still too wide, 100mm (3.93″) too wide. Now that’s only 0.625mm (0.024″) in N scale, so am I going to worry about it? Will you really see it? No! So I made the model 1mm wider to solve that problem!
In reducing the model down to N Scale some of the details become lost as they are too small for the 3D printer to produce. I use Shapeways to 3D print my models and they have clear minimum print specifications for the material I’m using, in this case FUD (Frosted Ultra Detail) so following their specifications I went through my model and enlarged or embellished all the fine details ensuring they were just above the minimum requirements. Below is the screenshot of the model at that stage.

I also went through and removed any unessential material to reduce the print cost so that the model will be marketable. I learnt with my first drawing that having more print material than I needed cost a fortune!
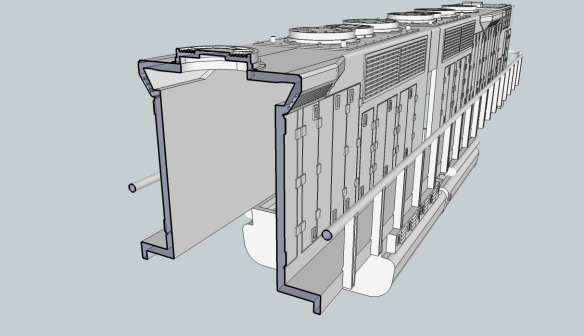
Now, the DD40AX has one huge fuel tank slung underneath. The DD35 had two GP35 tanks, plus they were shorter overall so I had to model a pair of those too. They are joined together and will use the same mounts as the DD40AX tank. I even remembered the bell which was mounted between the battery boxes and air tank on one side only.

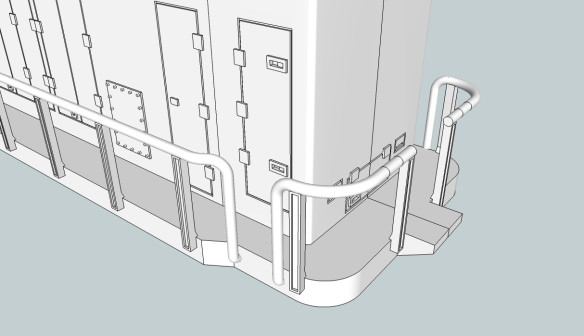
Next, the hand rails. Yes I know they look a bit fat in the pics above; that’s because they are! In order to make them print they can’t be the correct size, this is N scale after all and they would be too small to print. The problem I faced was with the length of them, they would be very fragile, and the chance of them surviving the post print process was negligible. Shapeways recommend putting stuff like this on a sprue or similar. But, as they charge by material volume, this adds a lot to the cost of the model. So, how can I protect them during the post print and shipping? How about putting them inside the DD35 shell!


All 6 handrails are inside the shell, joined by a 1mm long cylinder at the base of each handrail post. The idea is they can be cut out with a sharp knife once you get the shell home.
Now the drawing if the body has been finished and the issues with making it into a model have been resolved it is ready to be sent to the printers.
Next we will look at the chassis.

You must be logged in to post a comment.