Drawing a Dummy Chassis & Trucks for an N Scale EMD SD50 Part 3

Recently I shared with you my designs for a dummy chassis.  It was designed to be used with an Atlas N Scale SD50 shell, as shown below, and you can read the post here.  In this post I’ll show you the outcome and where you can get one.

emd-sd50-dummy-chassis-mk2-6

As I mentioned in that post, and as you can see below, the fuel tank was a little bit low.  This has been corrected in the 3D model, raising the tank connection points on the chassis and adding a tiny bit of height to the truck towers.

emd-sd50-dummy-chassis-mk2-7With the fuel tank and trucks painted in acrylic ‘locomotive black’, the loco looks the part and spent some time last weekend running around our club layout behind other locomotives.

ns-emd-sd50-dummy-chassis-2

This dummy chassis kit will also fit an Altas’ SD60 and SD60M shell as all three locomotives use exactly the same chassis.  The kit is available in both Shapeways’ Frosted Ultra Detail and Frosted Extreme Detail materials and can be found here.

If you want to use the original light board with the chassis this can easily be done with my ‘Dummy Chassis Circuit Board Mount’ as shown below.  The actual mount is printed in Shapeways’ White or Black Strong and Flexible material and can be found here.

emd-sd50-dummy-chassis-circuit-board-mount

In order to add power to the circuit board, power pickups need to be added to the trucks.  This is done in exactly the same way as with my C-628/C-630 dummy chassis trucks and will look similar to the example below. You can read how to do it in this post.

IMAG0603

Each truck will need three Fox Valley 36″ metal wheel sets (FVM3611), which are not included in the kit. If you don’t want power pickup then Micro-Trains 36″ plastic wheel sets will also fit but I recommend the metal ones as they add weight to the trucks.  The trucks on their own are very light and more weight helps them run smoothly.

The trucks are HT-C type trucks which EMD used from 1970 to 1994 on their three axle  trucked locomotives, the noticeable feature is the center shock absorber on each side.

emd-sd50-dummy-chassis-3

As these trucks have been used for such a large range of locomotives I have also made them available on their own.The kit consists of two HT-C trucks and two bolster pins. These can be found here.

Next week I’ll have some more 3D printed products to share with you.

Drawing a Dummy Chassis & Trucks for an N Scale Alco C-855 Part 2

As hinted at in last week’s post I’ve been working on the dummy chassis for the Alco C-855 and C-855B.  This week I’m going to share some of the progress with you.  You can read the first part here.

The actual chassis for the locomotive is a simple shape and as it fits inside the shell there’s no detail to add, with the exception of the air tank behind the fuel tank.  However, as this is normally hard to see I’m happy to 3D print the whole chassis in Shapeways’ White Strong & Flexible material.  This is a real bonus as, given the size of the chassis, it would be expensive in their Frosted Ultra Detail or Frosted Extreme Detail materials.  The WS&F is still very accurate which means the truck bolster pin holes will be in the right place as will the shell locating positions.

The trucks are very visible and in order to show as much detail as possible these have been designed to be 3D printed in the FUD or FXD which is currently the best quality 3D print material they offer.

In the last post about these trucks I showed you the first few steps which led to the basic truck and bolster pin connection being designed, as you can see in the image below.

alco-c-855-dummy-truck-2

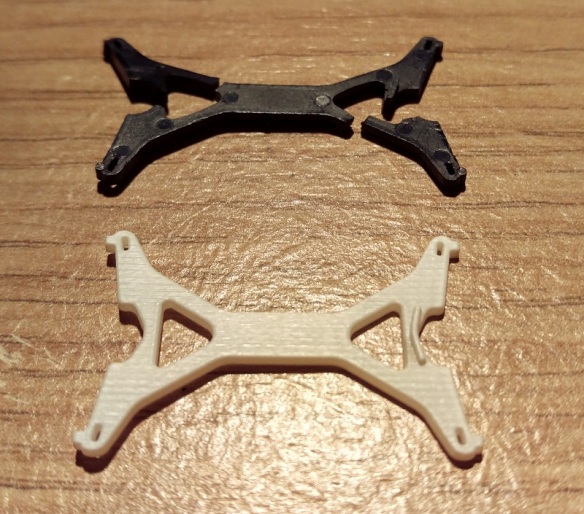
Since then I have developed the span bolster connection between the two trucks.  Unlike the prototype, which had a solid bar connection from coupling to coupling, the model uses a bolster pin to connect the lead truck to the chassis and the second truck simply floats between the first truck and the fuel tank.  The powered chassis trucks, shown below, are made of several parts which screw together forming a permanent connection, which can swivel side to side and has some up and down movement.

cpn-cor-u50-trucks

3D printing has the advantage of being able to produce the two trucks as one piece while keeping the movement between them.  Below is a section taken through the trucks in which you can see their connection.  The truck on the left has a lug on the back with a slotted hole in the end.  The truck on the right has a slot in the cross member which the lug passes through.  It also has a pin which passes through the hole in the lug preventing the trucks from separating.  The two trucks are inseparable and to make this as one piece in any other way would be impossible.

alco-c-855-dummy-truck-3

Below is render of the front pair of trucks.

alco-c-855-dummy-truck-4The second truck has no bolster pin connection on top but I’ve left a level area to add a weight if required. The weight may be required if the truck lifts or bounces as the loco crosses turnouts.

At the rear of the second truck is a tail which fits into the gap in the chassis fuel tank.  When the trucks are fitted to the chassis with the bolster pin the tail will stop the trucks from rotating out, but will still allow the trucks to swing enough on corners.

At the front of the trucks is the coupling connection.  As with my other models I’ve added a pocket to accept a Micro-Trains body mount coupler.  The pocket is upside-down so the coupler drops in from the top and is fixed with the standard small screw.   This was done to maintain the strength of the pocket without adding extra material; if the coupling was fitted from below the coupling areas would be very bulky which is expensive and wouldn’t look right.  On either side of the coupling pocket I’ve added the walkway texture which forms part of the access steps to the front of the locomotive.  The rear set of trucks, as pictured below, doesn’t have this detail, nor does it have such a big pilot. The pilot is the area around the coupling.

alco-c-855-dummy-truck-5

The C-855B dummy chassis will have the rear set of trucks at each end as there aren’t any access steps at the ends of the B Unit.

With the designs complete the C-855 dummy chassis and trucks were sent to print and arrived looking very nice.

alco-c855-dummy-chassis-test-print

The chassis section, as it’s printed in WS&F, was ready to use right away, but the trucks needed their normal cleaning to remove the waxy residue left over from the print process.

The chassis was a prefect fit inside the shell.  With the powered chassis I designed a replacement fuel tank which fitted to the underside of the metal chassis as shown below.

Alco C-855 Fuel Tank Fitting 2 (render)

This fuel tank section had holes in the sides to locate the shell lugs.  The dummy chassis has these same holes so the shell clips on and can only be removed by spreading the shell.

The holes for the bolster pins had a bit of surplus material in them so I reamed them out with a drill bit which was roughly the same size as the hole.  Then I was able to fit the two sets of trucks, making sure the correct truck was at the front and the tails were in the fuel tank slots.

The Fox Valley wheel sets dropped in nicely to the trucks and then the dummy chassis was ready for some testing.

alco-c-855-dummy-loco-1

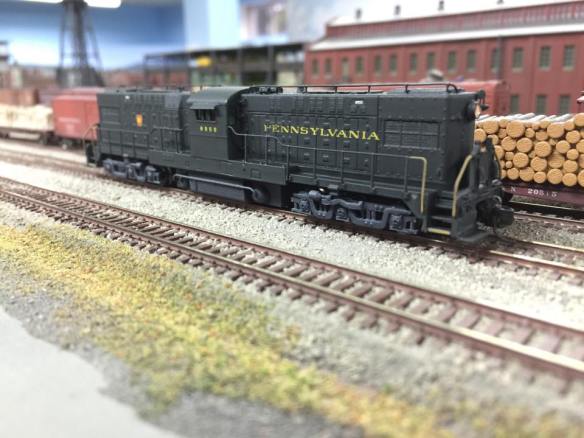
A UP heritage unit had the pleasure of pushing the dummy C-855 around our ‘Solent Summit’ layout this weekend at a running meet and it went very well.

I had put some weight inside the fuel tank area, as you can see below, and with the added weight of the metal wheels the dummy chassis tracked very well across turnouts and through bends.  I will probably add a bit more so when the weight of a large train is behind the locomotive it won’t try and roll as the train runs around corners.

alco-c-855-dummy-chassis-3

I am going to make a slight change to the spacing of the trucks by changing the length of the connecting lug so it perfectly matches the Con-Cor trucks used on the power chassis; currently they are spaced slightly closer together and I may add a little bit more depth to the truck frames just so they look exactly the same.

The next thing for me to check is the coupling fitting and height which I will be doing next week but for now I aam very happy with the C-855 Dummy Chassis.

alco-c-855-dummy-loco-2

The design for this chassis, once complete, can easily be tweaked to fit the Con Cor U50 and Gas Turbine chassis and I’ll be sharing that with you soon.

Drawing a Dummy Chassis & Trucks for an N Scale EMD SD50 Part 2

In this week’s post I’ve got some follow-up pictures for my 3D printed N Scale SD50 dummy chassis.  Back in November 2016 I shared with you my designs for this project and you can read that post here.  Since then I’ve ordered the chassis and trucks as a test print, which came out very well, as you can see below.

emd-sd50-dummy-chassis-6

The trucks fitted well and the chassis tracked well along the rails.

emd-sd50-dummy-chassis-7

However, in my eagerness to test the parts I’d forgotten that the fuel tank on Atlas’ SD50 is not the same as their C-628; which I was using as a template model.  Consequently the SD50 fuel tank was much wider and had no way of fixing to the new chassis, as you can see below.

emd-sd50-dummy-chassis-8

This was easily rectified by widening the chassis and creating the required fixing points, as you can see in the computer model below.

emd-sd50-dummy-chassis-mk2-1

Although this made the chassis much wider I was able to remove the unnecessary material by adding the holes and slots in the sides and base. This keeps the cost roughly the same as before; Shapeways charge by volume of material for their 3D printing service. The chassis section was then 3D printed and now it looks like this:

emd-sd50-dummy-chassis-mk2-2

Compared to the old chassis, as shown below, you can see the significant change which needed to be made.

emd-sd50-dummy-chassis-mk2-3

I also made some other alterations to the chassis.  I added a direction indicator to one end to mark the front; this made sense as the chassis was very similar at each end which meant I kept putting it in backwards!
emd-sd50-dummy-chassis-mk2-4

Also working with the original design I discovered it had a few weak spots which I was able to strengthen by adding stiffeners or simply thickening the material at that point.

emd-sd50-dummy-chassis-mk2-5

The new chassis and trucks fitted perfectly into the locomotive shell and, although they still needed to be painted and weighted, the dummy loco ran perfectly round the layout with a powered C-630.

emd-sd50-dummy-chassis-mk2-6

The coupling height is spot on but the fuel tank does seem to be very close to the railhead which could cause an issue when the loco crosses a transition to an incline.  However this is easily fixed by gluing the tank to the chassis.  The tolerance in the tank fixing allows it to drop, but when glued it will sit a bit higher.  In the 3D computer model I have lifted the tank fixing up a fraction to avoid this.

emd-sd50-dummy-chassis-mk2-7

I still want to do a few more tests, add some weight to the chassis and paint it to make sure everything is correct before I release the model in my shop but that won’t take long. These trucks have been used on many locomotives so I’ll also be releasing them with different length chassis to fit different shells.  If you have a specific locomotive which you need a dummy chassis for, let me know and I can do that one first.

On another note, this wasn’t the only dummy chassis in my delivery from Shapeways.

alco-c855-dummy-chassis-test-print

This is the considerably larger dummy chassis for an Alco C-855 and I’ll be sharing this with you in a later post once I’ve had a chance to test it out properly, but so far it’s looking very good.

A Way to Paint FUD & FXD 3D Printed Parts

I regularly get asked how to paint the Shapeways 3D printed Frosted Ultra Detail and Frosted Extreme Detail materials.  There are several methods that work but I thought in this post I’d share with you the method used by one of my fellow modellers, Chris Broughton.

Chris produces fantastic models, such as his Baldwin RT-624 as shown below.

RT-624 Button

This model has been made from one of my kits 3D printed at Shapeways in FXD. The kit arrives as shown below, except for the handrails which are fixed inside the shell for protection.

Baldwin RT-624 Kit

Chris also used my etched brass Addition to complete the model.

Baldwin RT-624 Additions Render

From here I will let Chris explain his method for painting his models;

“First, I soak the parts in Bestine to removed the waxy coating from the parts. I’ll leave them in for 2-3 days, since the Bestine doesn’t harm the parts. When the parts come out of the soak, I’ll rinse them in water and lightly brush them with a toothbrush.

PPR RT-624 (Chris Broughton) 1

Once they’re dry, I’ll lightly sand any areas that have a coarse texture from printing. In areas where there’s detail, I’ll using small sanding sticks and try to work around the details.

PPR RT-624 (Chris Broughton) 2

I use Tamiya Fine Surface Primer to prime the parts. If more sanding is necessary, I’ll sand and recoat with the primer.

PPR RT-624 (Chris Broughton) 3

As for paint, I’ve been using TruColor paint more recently. I’m used to using Floquil, so I’ve had to adapt since they’re no longer around.

PPR RT-624 (Chris Broughton) 4

I’ve been pretty happy with TruColor, but I get the best results over a primed surface, and it has to be thinned quite a bit for airbrushing (to the consistency of water). I just use 100% acetone fingernail polish remover for thinning and cleaning. The paint goes on glossy, which is great for applying decals, then spray with Testors Dullcote from a spray can to seal the decals and weathering, and give it a matte finish.”

PPR RT-624 (Chris Broughton) 5

Chris’ finished locomotive looks fantastic which just goes to show how well his method works.

PRR RT-624 8355(Chris Broughton) 3PRR RT-624 8355(Chris Broughton) 2

Many thanks to Chris for sharing his painting method and for the excellent photos.

Last week I had promised to share some new products with you and I will be shortly, I’m just making a few last minute adjustments.  As for this coming weekend I’m going to the NMRA (BR) Benson Winter Meet and hopefully I’ll have some photos and videos to share with you from the show.

A New Tender Draw Bar for a Marklin 4-6-2 – Part 2

Happy New Year and welcome to 2017, and as promised in last week’s post I have a new product to share with you this week.  Back in November of 2016 I posted about a replacement tender draw bar design for a Marklin 4-6-2, you can read the post here.

The locomotive, as pictured below, is tender powered and the link from the engine to the tender is sprung.  This adds a visual softness to the acceleration and deceleration of the engine by helping to disguise any sudden movements when the locomotive starts and stops.

marklin-4-6-2-tender-drawbar-1

The original draw bar was badly damaged and so attempting to glue it together wasn’t very practical.

marklin-4-6-2-tender-drawbar-4

A new draw bar was drawn up and 3D printed in Shapeways Frosted Ultra Detail material.

marklin-4-6-2-tender-drawbar-7

The picture below shows the original springs fitted nicely into the new part.  The raised strip on the left of the part is to stop the spring moving too far when the draw bar is under compression.  The same detail’s on the right but it’s on the underside.

marklin-4-6-2-tender-drawbar-8

Test fitting the part went well, as you can see below.  The system fits by locating the loop in the spring around the peg in the locomotive; there is a bolt in the tender which act in the same way.  As the powered tender moves forward the springs compress untill the force matches the strength of the sprung steel.  Then the engine starts to move.

marklin-4-6-2-tender-drawbar-9

With the loco body fitted there’s a nice close fit between the tender and engine, possibly a little better than the original draw bar as the new one is ever-so-slightly shorter.  Also, because of the spring system, as the locomotive navigates a corner the gap opens up preventing the tender and engine from binding or locking up.

marklin-4-6-2-tender-drawbar-10

The draw bar also pivots at both ends.  The bolt at the tender end is visible near the front of the tender.  The other end pivots under the front of the cab.

marklin-4-6-2-tender-drawbar-11

The last thing to do was remove the new draw bar and paint it black.  Once it had dried and been refitted the locomotive was ready for use.

marklin-4-6-2-tender-drawbar-12

The replacement Marklin 4-6-2 tender draw bar is available from Shapeways here.

Next week’s post will be about another new 3D printed part and I look forward to sharing it with you then.