In last week’s post I shared with you my designs for a stackable enclosure that allows you to build any height sound box for your DCC speaker. You can find the post here.
This week the parts have arrived from Shapeways and I thought I would show you how they came out. Right out of the box the parts are transparent and look like this.
The hollow parts are the wall sections and the closed off parts are the bases As with all parts printed in the Shapeways Frosted Ultra Detail material they need to be cleaned up to remove the waxy residue left behind from the printing process. This is done by soaking the parts in Goo Gone overnight.
Once the parts have had a good soak they are rinsed off with water and left to dry. As they dry they will turn opaque and can now be painted if required. If you dont clean off the waxy residue it will prevent paint and glue from adhering to the surface of the part.
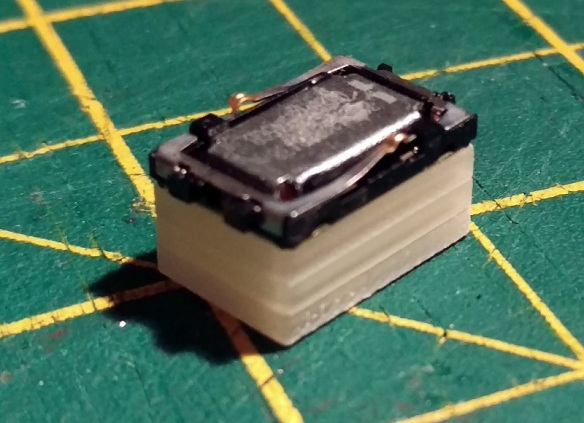
With all the parts clean and dry it was time to do some test fitting. As designed, they all fit together perfectly, and with a spot of glue will be come a solid enclosure. The Zimo speaker is also a perfect fit; it actually fits better into the 3D printed part than it does into the injection molded enclosure it came with.
The depth of the enclosure can now be easily adjusted by 1.5mm by adding or subtracting a wall section.
These means you can create any size enclosure that you need.
It even fits into the base on its own should you be very tight on space.
The next stage is to do some testing to see how it sounds compared to the stock enclosure. As a comparison here is a video of the stock speaker that comes with the decoder. You can hear the engine running and me sounding the horn.
Next we have a video with the Zimo speaker fitted on its own. A word of warning; the speaker is designed so that you can solder wires to it, but remember a speaker has a powerful magnet inside and if you are not careful it will attach itself to the soldering iron and get very hot, causing damage to the speaker.
The speaker on its own is very quiet as there is nothing behind it for the sound to bounce off.
Then we have a video showing the Zimo speaker with and without the stock enclosure. When the speaker is lowered onto the enclosure the volume gets much louder.
And finally we have the Zimo speaker and the 3D printed enclosure made from three wall sections. The volume increase using the 3D printed parts is roughly the same as the stock enclosure.
The parts that made up this enclosure were not glued together for the test so the sound should get even better once they are all sealed up.
I will shortly be making these speaker enclosures available via Shapeways and through my blog where you will be able to get them in different quantities.
There are now many options for adding sound to DCC locomotives but, with the limited space often found inside N Scale locomotives, fitting in all the parts can be a problem. Apart from the actual DCC decoder the speaker is one of the larger problems and in this post I will share with you my design for a customizable speaker enclosure.
When you buy a DCC sound decoder it normally looks something like this.
This sound decoder, model SDN136, is made by Digitrax and is designed to fit into N Scale locomotives. The standard 8 pin plug is attached to the wires coming out of the left hand side. The right side has wires attached to the speaker and a capacitor which is used to keep continuos power to the decoder when crossing dirty track. This prevents the sound from stuttering.
The speaker has a sticky area with white peel-off paper. This can be stuck to the inside of a locomotive shell, preferably in an area which has some holes to allow the sound to come out. Although this works it can be very quiet as the speaker is small and not capable of making lots of sound. Or it may simply sound tinny.
To improve the sound volume the speaker can be placed inside an enclosure. This works in the same way as speakers used for home stereo systems. The speaker is fixed to the front of the enclosure facing outwards. The air inside the enclosure acts like a spring returning the speaker cone to the ‘zero’ position more efficiently than if it was surrounded by open space. Not only does this reduce noise from the back of the speaker but it amplifies the sound from the front.
Several companies sell speakers already mounted on enclosures and these can easily be used to replace stock speakers. However the speaker is now getting bigger and finding space for it can be an issue.
A speaker which has been regularly used by members of my local club is the Zimo LS8X12. This speaker comes with an enclosure as you can see in the images below.
The speaker simply fits into the recessed top of the enclosure.
Because the enclosure is fairly deep by N Scale standards, it doesn’t fit into some of the locomotives. To get around this the modeller tends to file or cut down the enclosure. Because it is tapered this then creates the problem that the speaker no longer fits properly and may leave gaps around the edge preventing the enclosure from working effectively.
To solve this I have designed an enclosure that is built up in layers allowing the modeller to make it as deep as they want in 1.5mm steps.
The enclosure is made from two different types of part. The first is the base and the second is a wall. They are both shown below from top and bottom. The recesses in the tops of both allow the speaker to be fitted, even in the base.
The walls push together creating a 1.5mm extension to the enclosure. Once it’s at the required size the speaker will simply fit into the top wall section.
There is a tolerance gap between the flange that fits them together to allow a small amount of glue. This will hold the parts together and ensure a good airtight fit.
I have now ordered a test set of these enclosure parts in Shapeways ‘Frosted Ultra Detail’ material and I should have an actual working enclosure to share with you soon.
Over the last three weeks I have been sharing American model railroads with you from the NMRA BR Convention. So in this week’s post I will be sharing some English model railways from last Sunday, the 8th of November 2015, Poole & District Model Railway Society’s annual exhibition.
The exhibition which was held at the Poole Grammar School on Gravel Hill in Poole, Dorset, England. As the show is only a one day event the majority of the layouts are small due to the time it takes to set up larger ones. However this is no reflection on the quality and we had some great layouts this year.
To start with we have ‘Addiston South’ built by Paul Egleton. This is modeled in EM gauge and is 15ft end to end layout.
Here is Paul’s description of the layout.
‘The layout is based on the now demolished Addiscombe station in Croydon, which closed with the last train on 31st May 1997. Addiscombe was the terminus at the end of a two and a half mile branch line from Elmers End on the main line to Hayes. The only other station on the branch was Woodside, this being a junction with a line to Selsdon until 1984. The carriage sidings along side the station have been retained but the carriage shed has been replaced by the goods yard and a warehouse based on the one near East Croydon station. The passenger stock is mainly Southern Region EMUs working the half hourly shuttle from the mainline. Freights are worked by a variety of diesel locomotives. Most of the scenery is by Woodland Scenics. Buildings are constructed using Slaters or Wills products. The period of the layout is 1968 to 1974.’
On the end of the layout I loved the station entrance scene; it was beautifully modeled but it was also at a different angle to the baseboard giving a greater feeling of reality.
The next layout is ‘Hedges Hill Cutting’ which is an N Scale layout owned by The Bentley Model Railway Group and built by Grahame Hedges.
Here is BMRG’s description of the layout.
The Fiction
Hedges Hill Cutting is just that, a cutting located in the suburbs of south London at some time in the early 1990s.
The Facts
Hedges Hills Cutting is a popular and well-known layout and so when its originator Grahame Hedges decided to sell the layout in 2008 The Bentley Model Railway Groupleapt at the opportunity to add this little gem to their collection.
The layout is extremely compact, the original narrow width of the layout was the maximum that would fit through the loft hatch where the layout was stored. Also being the first exhibition layout that Grahame built it was a test bed for his various modelling ideas and he opted to avoid the hassle of joining baseboards. Thus the whole layout was designed to fit on a single board that could be handled by one person plus had a strong chance of reaching completion before interest waned and desire to start something new took over.
All the buildings and structures on the layout, with the exception of one SR platelayers hut (in the single line refuelling yard), are scratch built from cardboard. Some commercial modelling products have been used, such as the Ratio water tank and factory chimney, Plastruct girders, PECO wagon tanks, and occasionally plastic embossed roofing sheets, but the vast majority are made from card either covered with brick paper or simply painted with acrylics.
Many of the buildings on the layout are of actual prototypes, either modified to suit the location on the layout, or built as they really stand. For such a small layout there are quite a few buildings and all of them are modelled, along with the railway, in space a maximum of 15 inches wide and less than six feet long.
There are three pubs (the Ship and Royal Standard from Croydon and the Beehive from Peckham), a wealth of shops (Halfords, British Gas showroom, Hedges Healthfoods, Ace Cabs, Newsagents, and Ladbrokes) plus one closing down and one up for let (which is typical for the era), a bank (Lloyds), a building society (Lambeth), an Indian restaurant (Natraj), over twenty domestic houses, various industrial buildings, a London Transport underground station (based on New Cross Gate station without its pitched roof), a gas holder site and a brewery (very loosely based on Robinsons Unicorn brewery in Stockport). Please note that the LT station is assumed to be the ground level entrance with the tube lines and platforms deep underground and out of sight below Hedges Hill.
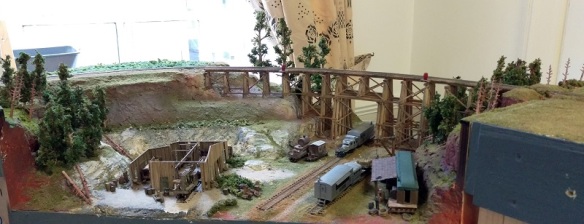
The North end tunnel entrance is based on Denmark Hill tunnel (with three lines instead of four) and the middle road bridge is loosely modelled on Goat House bridge at West Norwood complete with its outside sewerage pipe.
The location was chosen as Grahame lived in various locations in South London for quite a few years and his railway experience and interest is in the electric third rail, which is not very often modelled in N gauge. Selecting the Network South East area of London meant an urban setting with buildings and industrial developments as opposed to the more usually modelled and unjustifiably popular green rural scene with fields and farms. Urban settings often offered what Grahame considered more interesting architecture and civil engineering.
I always find the fiddle yards at the back fascinating.
I think that truck must have serious engine problems as it was there all day!
Here is a short video of ‘Hedges Hill Cutting’.
As well as show layouts we also had a display from Computer Control & DCC. This team of DCC experts have a very nice display allowing visitors to try different brands of DCC systems. Below is a an example of the ESU ECoS pod.
On each pod is the DCC controller and all the associated control equipment such as point controllers and track detection equipment. Plus a section of track with a point/turnout which is connected to the system. The locomotive also has a sound decoder. This allows the team to demonstrate the features of that particular system and allow the visitor to try it out.
This pod below is the Roco Z21. This system is designed to interface with your tablet or smart phone for train control; note the WiFi unit next to the Z21.
As well as the DCC controllers the team also have a computer controlled demonstration layout that can be totally automated or operated via the computer using the Traincontroller software.
Trainconttroller is the system used on the McKinly Railway that I visited several months ago and you can read my post about that here.
Although this exhibition is in England we still had some US HO layouts and the first was ‘Hinkle Mill’ built by Neil Lancaster.
Here is what Neil has to say about the layout.
‘This layout is based on a short line railroad in the USA which served the Hinkle Milling Company, a 19th century feed mill which served Thomasville, North Carolina. The mill supplied all sorts of grain and was packaged there for various livestock and poultry feeds. Hay was sold along with fertilisers, lime and seeds.
Whilst the feed mill itself is depicted fairly accurately, some modelling licence has been taken with the location and design of the outbuildings and fertiliser plant. Yes, the hay barn really did have a walnut tree growing through the roof!
The layout is operated by a Digitrax DCC control system and some of the locomotives have sound installed. The buildings are all scratch built with some based on prototype drawings. Track is by Peco.’
I loved the tree growing through the roof of the John Deere building. Neil said he has a photograph of that so it really did happen!
As well as the model shops and traders we had some very interesting stands. Below are some photos of Greenwood MRP display. They produce quality laser cut full indexing turntable systems and other wood structures in most scales. The coach and the turntable below is O Scale.
This turntable is OO/HO.
The next layout is ‘Springfield’ which is an O Scale GWR layout built by Phil Dawling.
Here is what Phil has to say about ‘Springfield’.
‘Springfield is a market town in the Southwest of England, the branch line joins the main Yeovil to Weymouth just North of Maiden Newton.’
Built by local landowners and operated by the GWR for the local company.
The line is approximately fifteen miles in length with one or two steep Gradients, hence the trains are fairly short.’
Another trader with a display stand was Model Railway Solutions who had an impressive display of weathered locomotives. MRS offer weathering as one of their many modeling services. Here is a link to their weathering service.
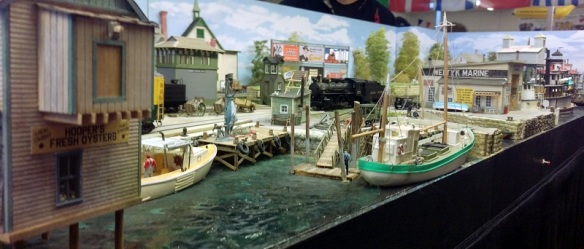
The next layout is also our second US HO layout, ‘Red Hook Bay’. It was built by Mike Carter and won our ‘Barry Beacock’ award for best layout in the exhibition.
Here is what Mike says about the layout.
‘Red Hook Bay is a fictitious busy seaport on the coast of Maine, USA.
Besides the local fishing industry it has a brewery and a dairy.
Set in the late steam/early diesel era, also a local tram service can be seen running to the tram stop in front of Hokums Burlesque Theatre on Main Street.
To add to the realism the magnificent structures have been deliberately made to look a little worse for wear.
The layout is operated with a Digitrax DCC System which allows independent control of the locos, Switching (shunting) using Kadee couplers and Under track magnets.’
You can see more photos of Red Hook Bay here from my review of the NMRA Benson Winter meet in 2014.
Ray Heard Model Railways is a another of our local traders and as usual he had an impressive sales stand of models trains for sale. I was particularly impressed with this set of express locomotives in O scale representing three of the big four British railways before privatization.
The next layout is an Sm Gauge model railway called ‘THE SHK-bahn’ built by David Ward. What makes this layout particularly interesting is it’s a working rack railway (also know rack-and-pinion railway orcog railway).
Here is what David had to say about the layout.
‘The Saxeten Gemeinde Karren-bahn is set in the Bernese Oberland region of Switzerland around the village of Saxeten. It is a metre gauge rack railway built to a scale of 5mm to one foot – very close to S scale.
The origins of the railway lie in the end of the 1890s, when the villagers of Saxeten saw the Berner Oberland Bahn (opened 1890) bring increased prosperity to the villages of the Lütschinen valleys. Accordingly a plan was developed to link Saxeten with Grisalp and Kiental
The model uses rack assistance to negotiate the steep inclines, and the catenary is fully working.
All the stock is scratch-built, and the locomotives use Fleischmann, Hornby or hand built chasses. The track is a mixture of hand built and proprietary.’
Here is some video of the rack locomotives working up the hills.
The Slim Gauge Society from the Slim Gauge Circle also had a display stand.
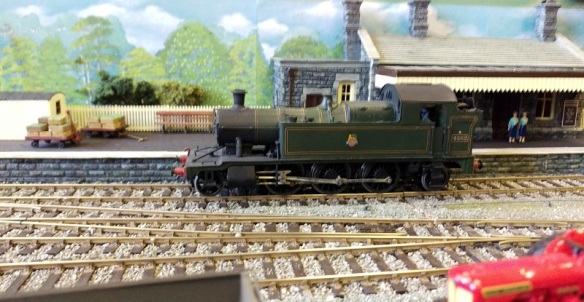
The next layout is ‘Trelill’ built by Josh Voce and is an N Gauge set in the Southern region.
Here is what Josh has to say about ‘Trelill’.
‘The model is set in the “withered arm” area of British Railways between 1948-1966.
The village of Trelill never had a station even though the North Cornwall Railway ran close by.
There is a mixture of passenger and goods service that serve the station including the passing of the famous Atlantic Coast Express twice a day.’
The staging yard at the rear of the layout utilized a pair of traversers to swap out trains in each direction.
Here is a short video of two local trains passing at Trelill.
The final layout from this year’s show is a 009 Gauge layout called ‘Wickhambreux Rd’ built by David Marshall.
Here’s what David has to say about ‘Wickhambreux Rd’.
‘The layout depicts Wickhambreux Road on the Canterbury Light Railway, the line was built by the local colliery.
The colliery needed a railway to give them access to the port of Dover and also the rest of the network to distribute its high grade coal.
The CLR ran a variety of locomotives & stock but due to its very run down condition it finally it closed in 1951.’
The curved backdrop on this layout really added depth to it and having the road raised behind the railway also added to this effect.
And that was the 2015 PDMRS exhibition. Next year’s show promises to be bigger, with more layouts, but with the same quality the show has built up over the last few years. For those of you that regularly come to this show or are thinking about it for next year please note that it will be moving forward by one week and in 2016 it will be on the 6th of November.
In next week’s post I plan to get back to showing you more of my 3D printed drawing work for some of my upcoming projects.
In this week’s post I am continuing from where I left off last week; showing you the layouts on display at this year’s NMRA (BR) Convention. You can read part one here and part two here.
Getting right into it we have the N Scale Modular layout from the Dutch group PH & LF Railroad Association. This impressive layout was brought over from Holland for the show and was made up of modules from different groups. At each end was a return loop, one of which was supplied by the host club, the Black Diamonds. The loop shown below was built by the Starmans Brothers.
The Starmans brothers are big Pennsylvania Railroad fans and have a huge variety of Pennsy rolling stock and locomotives.
Leaving the loop, the line enters a single track main line and passes through a town scene which is still under construction.
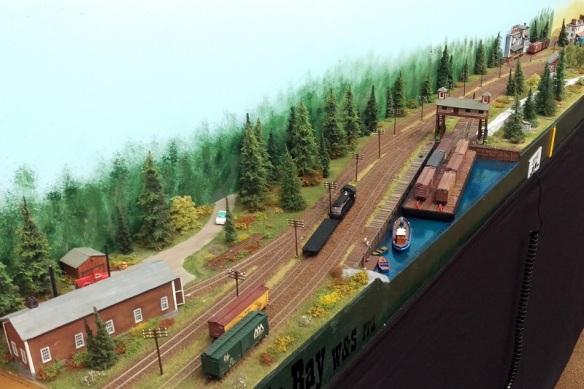
The line then enters my favorite section of the layout which was built by Wim and Susan Kieskamp.
This scene is beautifully modeled and the freight car ferry terminal was wonderful.
Leaving this scene the main line turns into a traditional N track module layout with the three main lines.
Again the details were beautifully done; these pictures simply don’t do them justice.
A Baltimore & Ohio EM1 rolls through with a long freight drag.
These modules are mostly industrial, giving plenty of switching around the 3 main lines.
The only station area is situated in the shadow of office buildings, above a freeway, giving the feel of a big city station.
Leaving the industrial section the main lines pass a large container and intermodal yard.
A Pennsy K4 heads a fast freight past the terminal.
This K4 is one of Bachmann’s new models with sound and below is a short video of it running past the roundhouse.
The next layout is a modular HOn3 layout which depicted logging and narrow gauge railroading through the high mountains.
These locomotives are wonderful machines and come with sound as well as fantastically smooth motion. Below is a short video of two running on the layout.
The final layout, not including our own that is, was a HO layout which I didn’t get a lot of time to visit. So apologies to the owners and to you for not having many photos. However I did pop over as they were setting up and they had a huge EMD DDA40X sat outside the engine shed purring with its onboard sound chip.
Behind the shed was a turntable and loco staging area which I am sure later was full of motive power.
I also managed to grab a quick video.
So that brings us to my club’s layout ‘Solent Summit’. If you’ve been following me for a while you may have already seen photos of this layout on my blog and may even be familiar with it. However we now have several new modules and this show was the first time we had erected them all; except for one. So even if you have seen it before here is a video I took to give you an overview of all our modules, new and old, as we were getting ready on Sunday morning.
Throughout the weekend we ran a variety of equipment; Solent Summit is a main line for all railroads. Below we have a D&RGW L-131 leaving Solent Summit on a coal drag. This was converted from a Bachmann EM1.
A DD35 sits in the team track at Solent Summit awaiting its next job where big power is needed over the summit.
A Union Pacific ‘earthworm’ awaits departures from New Mills halt. The water column to the right is soon to be a thing of the past as this new breed of motive power evolves.
And to power these new locomotives the need for oil continues to grow; luckily this guy has found oil near the railroad.
The CSK and a relic from the former Monon railroad wait in Solent Summit for an oncoming train.
A Virginia Railway Express bi-level Commuter train sits in Solent Summit as a local freight trundles past.
Over at the sawmill the switcher is bringing more log cuts in from the woods on skeleton cars.
As well as boxcars of timber products, saw dust is collected and shipped away in the large gondolas by the Burlington Northern railroad.
UPs SD40-2 power moves coal down the main line.
Over at ‘Priddy’s Yard’ a long mixed manifest rolls by as the local steam switcher awaits its next job.
The mixed manifest was headed by an A-B set of Alco FA units and an EMD DD35 giving the extra boost.
Although the big passenger trains don’t stop at New Mills halt the workers all arrive on the local stopper.
The factory has borrowed a 44 tonner switcher from the Rio Grande.
The 2-8-0 Consolidation has been fitted with sound. Here’s a short video of it leaving New Mills.
And, as you may have seen from my previous posts, I have been getting my new modules ready for this show; New Mills is one of them and my trestle over the Warsash River is the other. The module is called ‘Warsash Wye’.
A mighty UP Challenger heading the Portland Rose crosses the trestle.
It’s the end of the summer and the Warsash River has all but dried up.
Later in the day a trio of Alco FA’s from the Spokane, Portland & SeattleRailway trundle across.
Closely followed by the Northern Pacific’s North Coast Limited Vista Dome headed by a large 4-8-4. I guess the EMD F3s are in the shop.
With winter approaching the snow plows are moving out to key locations anticipating the big drifts of snow.
The line to the left in the photo below runs out of the module though the mountain, splitting the main line. This gives the module its name, the ‘Warsash Wye’.
Back in Solent Summit the North Coast Limited Vista Dome takes on passengers as a Burlington Northern ore train passes
UP excursion train tenders await the next steam special heading over the Summit.
The snow plow has arrived in Solent Summit where it will wait untill needed.
The UP always has big power over Solent Summit and here is a video of three DDA40Xs and a DD35 puling a long line of boxcars.
The Amtrak ‘Texas Eagle’ sits in Solent Summit.
The Summit allows trackage rights to all sorts of railroads; here is a video of the Canadian Pacific running over the Warsash Wye trestle.
A pair of Rio Grande GP60s head a mixed freight out of town.
A fun side to the convention is when we run trains at night, which gives a whole new aspect to the layout. Below is a video of the Amtrak ‘Texas Eagle crossing the Warsash Wye trestle at dusk.
‘Solent Summit’ is great fun to operate but it could not be done without the team, and here they are. From left to right, Ted, Morgan, Bob, myself, Chris & Chris.
And that wraps up my review of the NMRA BR 2015 Convention. I’d like to say a big thank you to the Black Diamonds for putting on a great weekend and I’m looking forward to the 2016 NMRA BR Convention which will be hosted by The Thamesiders on Friday 28th to Sunday 30th October 2016 at the The Best Western Plus Manor Hotel, Meriden, England. Here’s a link to next year’s convention, hope to see you there.
In this weeks post I am continuing my report from this years NMRA (BR) Convention which was held in Derby, England by showing you some of the layouts that were on display. You can read part one here.
Just before we get into the layouts; if you are considering getting any 3D printed items from Shapeways then this is the week to do it, because they are offering free shipping on any order. The offer expires on November 8, 2015 at 11:59PM PDT. All you need to do is enter the code FREESHIPNOV at the checkout.
Getting back to the convention, there were some lovely layouts this year and as usual because I was part of the operating crew for our own large layout, I didn’t get the time to look around the other layouts and take enough photos to do them justice. A lot of the photos were taken after the show had closed on the Saturday so not too much was running but I did get some nice shots which show of the layouts well.
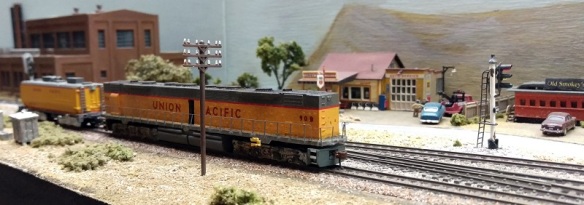
To start with we have Padden Flatts. This is a HO scale switching layout set on the Union Pacific Railroad.
The main section of the layout is entered from the right hand side, shown below at the bottom of the picture, from a small staging yard.
The main line is the center track which is evident by the lack of weeds and grass in the ballast.
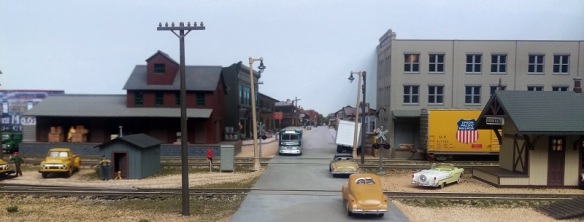
There is a good use of a photographic backdrop as you can see when looking through the level crossings.
The layout was operated from the front allowing the operators to see the layout at its best and interact with the viewers.
There was a lot of nicely modeled scenes like the delivery van in the picture below parked just off the road.
The delivery van driver is knocking on the door of the building he is parked outside.
This guy is having a break while his dog runs around the yard.
All the rolling stock was very nicely detailed and weathered. The caboose in the photo below looks like it has done a few miles.
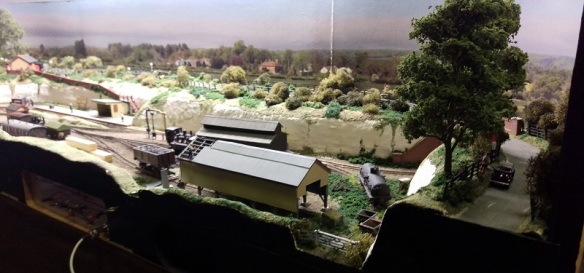
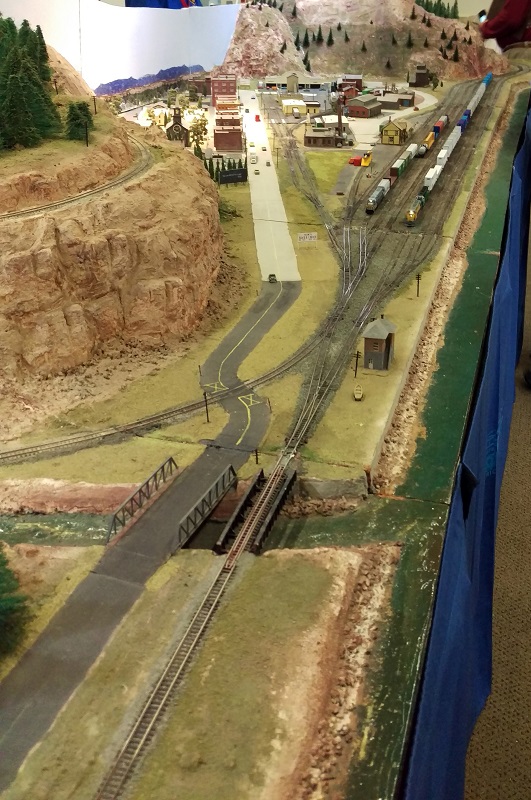
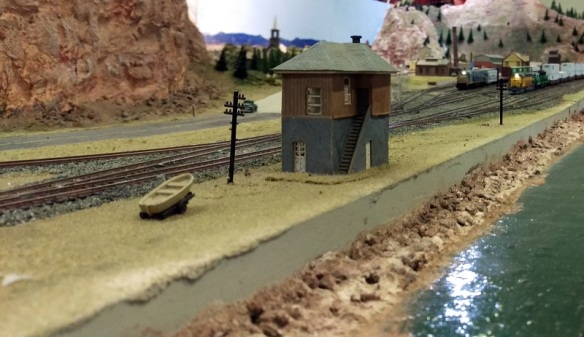
Next we have an N Scale layout called Hills County.
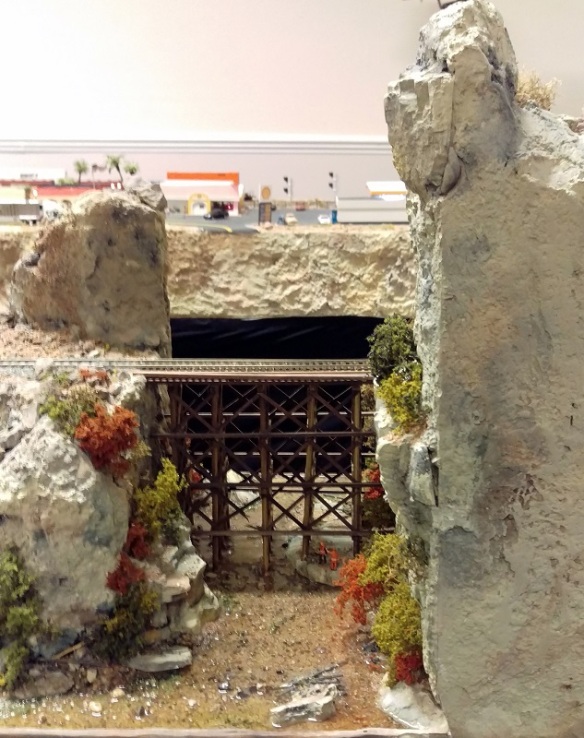
This layout is very deep which helped give a real sense of landscape as the trains rolled through. It has lots of mountains and bridges, which I always like.
At one end there is a town and yard scene. Because of the depth of the layout the town could be modeled at a different angle to the railroad without looking squashed.
As the main line leaves the yard it splits. The front line runs to the end of the layout and round the back to a hidden yard. Then, forming a loop, returned to the town yard. The other line runs up through a canyon and twists it way up over the top of the layout crossing itself on the bridge as shown below.
The high line gains a lot of altitude as it traverses the layout.
The mountain line eventually returns to the town yard forming a second loop.
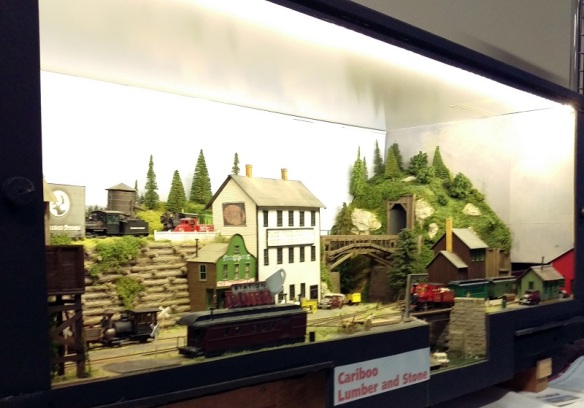
The next layout is a lovely HOn30 layout called Cariboo Lumber & Stone.
This layout has its own cabinet with lighting making a nicely boxed view.
There were some wonderful unique railroad items running up and down.
The layout had trains running in the foreground on the low-level line as well as in the background on the high level.
On the sides of the layout were staging yards for each line.
As well as all the layouts there where also lots of traders selling a huge variety of railroad equipment. One item that stood out to me, simply because of the size, was on Richard Maxwell’s Brass stall.
All three parts form one locomotive which delivered 7000 HP. Its UP’s unique coal turbine and this huge brass model is in O Scale!
The next layout is Coyote Creek, which was a HO Railroad running modern image as well as a few steam Shays.
There was a lot of home-made rock which set the scene of Arizona fantastically.
The layout was designed to be viewed on all sides with the operators in the middle.
The level of detail was very high and there was so much to look at, this burnt-out building below was very nicely done.
Even the front fascia of the layout had detail in it, at the bottom left there was a small scene depicting ancient ruins.
I still have four more layouts to share with you including our own, Solent Summit. These will be covered in next weeks post, but in the meantime, if you are in the area of Poole in England this Sunday the Poole & District Model Railway Society are having their annual model railway exhibition. Here is a link to the exhibition page on their website.
And don’t forget about Shapeways free shipping event!


 The next layout is ‘Hedges Hill Cutting’ which is an N Scale layout owned by


 Another trader with a display stand was


 The next layout is ‘Trelill’ built by Josh Voce and is an N Gauge set in the Southern region.


 Over at ‘Priddy’s Yard’ a long mixed manifest rolls by as the local steam switcher awaits its next job.


 The layout was designed to be viewed on all sides with the operators in the middle.


You must be logged in to post a comment.