A Baldwin RT-624 in HO – Now Available

This week, as promised, I’ve made the HO Baldwin RT-624 kits available to purchase. They’ve now passed all of my checks and had all the little improvements made.

There are two kits available, and both look very smilier but there are differences. Below is the first version.

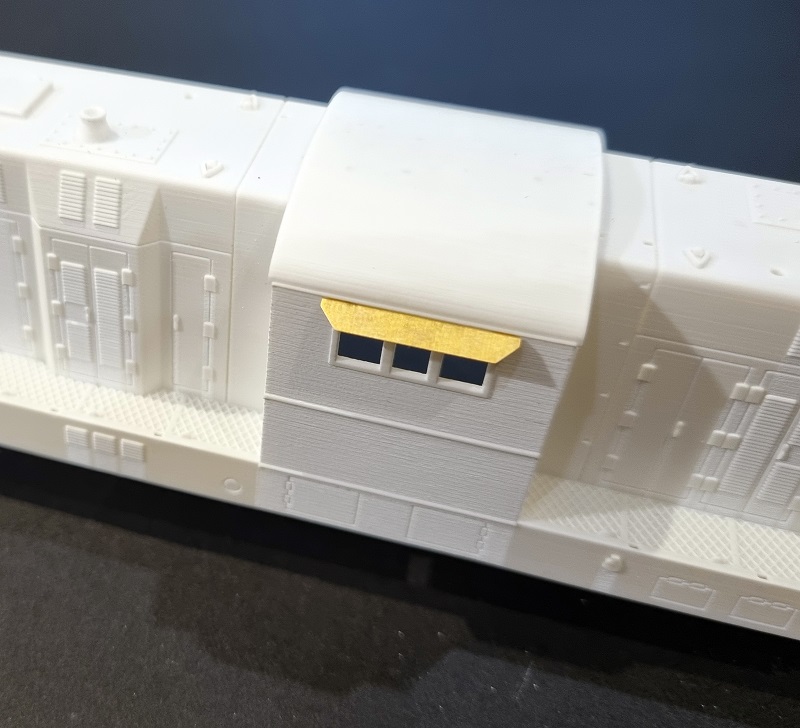
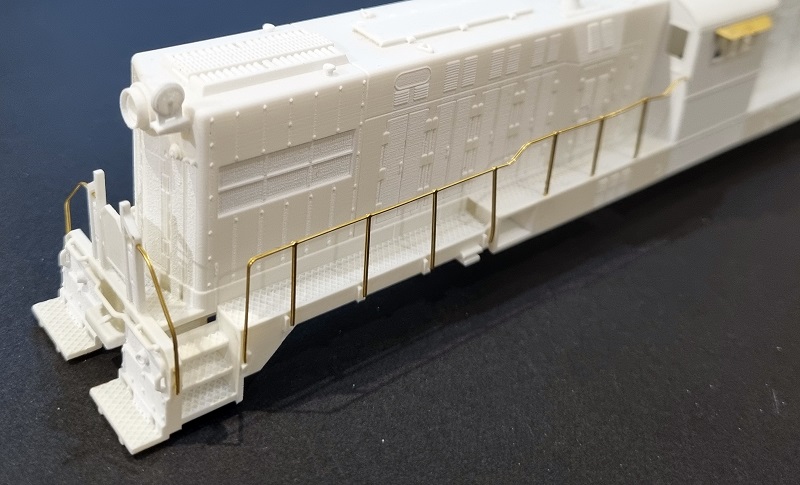
This kit is for the early Pennsylvania Railroad RT-624 locomotives with the Trainphone. The kit has three parts; the main 3D printed shell, 3D printed detail parts, and etched brass Additions. The 3D printed detail parts and etched brass are the same for both versions.

The second version is for the later Pennsylvania Railroad RT-624 locomotives without the Trainphone. It also has some body differences such as a different headlight position.

The donor chassis used for this model is a Bowser C-628 or C-630, the kit does not come with this.

Please also note that these locomotives have the correct asymmetric trucks but they’re facing the wrong way round. It will work but in order to make it look right you will need to rotate the trucks. As with my DT-6-6-2000 kit I developed a 3D printed kit for rotating the bowser trucks and re-using their side frames. (Bowser sell the correct side frames as spare parts if your donor chassis has the wrong ones).

All the parts are available from the links below;

Early PRR HO RT-624 Body Shell

Late PRR HO RT-624 Body Shell

3D Printed Detail Parts (For both versions)

Etched Brass Additions (For both versions)

3D Printed Truck Rotation Kit (DT-6-6-2000 Kit also for all RT-624 versions)

Commonwealth truck side frames are available from Bowser with their kit 96-603; it can also be used to upgrade an older Stewart Chassis to better pick up if that’s the one you have.  It can be found at the bottom right of the Bowser page using the link below. (If these become hard to get let me know, I can make a 3D printed set of side frames available.)

https://www.bowser-trains.com/instructions.html

The couplings for this locomotive has been designed as Kadee #148 HO Scale 140-Series Whisker® Metal Couplers with Gearboxes – Universal – Medium (9/32″) Centerset Shank.

https://www.kadee.com/ho-scale-couplers-c-274_276_284/148-ho-scale-140series-whisker-metal-couplers-with-gearboxes-universal-medium-932-centerset-shank-p-298.htm

These locomotives have also been designed to receive powered Kadee couplings using Precimodels motors. To make the couplings powered you’ll need the Precimodels kit.

https://www.precimodels.com/en/

The last shell in the HO RT-624 range will be the single Minneapolis Northfield & Southern locomotive numbered Twenty-Five which I’ll soon have finished.

If you have any issue ordering or any questions please let me know. Ready-To-Run versions can be made on request if you prefer, please contact me via the contact page for a quote.

Now the kits are finished I’m going to paint up the two test prints. I have an ATSF DT6-6-2000 and an early PRR RT-624 which I think will look great, and I’ll share them with you once done.

A Baldwin RT-624 in HO – Part 6

This week I have the final stages of testing to share for the HO Baldwin RT-624 before it’s released next week.

The big news is the etched brass has arrived. Thanks to all of you who pre ordered, your etch will be in the post this week.

The etch fret contains handrails, sun visors, grab irons, windscreen wipers, train phone antennas and MU hoses.

All the parts for the HO RT-624 kit look like this.

You may also need the truck conversions to rotate the Bowser trucks in the donor chassis as shown below. These are the same as for the HO DT6-6-2000 model and when I release the RT-624 next week I’ll include a link for these.

Lots of the details on the RT-624 etch are the same as the DT6-6-2000 but I still wanted to test fit as much as I could. Please note that in the photos the shell and 3D printed parts haven’t been fully cleaned yet and the brass is not glued in, just resting in place.

The end handrails are half etch and half 3D print. For strength the etch parts pass through the 3D print.

The sun visors fit nicely into the angled slots in the shell.

HO RT-624 - Brass Test Fit 06

The side handrails all have holes or locating lugs to fit into and it fits well, but as you can see its a little bent. This is simply because I got a little over enthusiastic cutting it out. As the etch is thick, 0.5mm, it takes some force to cut. I cut mine out on a cutting mat with a large craft knife (Box Cutter) and the force bent the handrails. The trick is to put something hard and flat on top of the etch to prevent the part you are cutting out from bending up.

HO RT-624 - Brass Test Fit 07
HO RT-624 - Brass Test Fit 08

The grab irons are basically the same as the DT6-6-2000 but I’ve made a slight change to the holes which made them a perfect fit. I fitted them without bending. Once pushed all the way in they easily bent down. Each grab iron has a small lug preventing them from being pushed in too far. When fitted with glue these will be secure and strong.

HO RT-624 - Brass Test Fit 09

All four on the side are the same.

HO RT-624 - Brass Test Fit 10

The top grab iron doesn’t bend.

HO RT-624 - Brass Test Fit 11

The last check I wanted to make from the etch was for the MU hoses. Each end has eight and they push into the square holes in the 3D printed section of the end handrail.

HO RT-624 - Brass Test Fit 12

It looks a little out of line as nothing is glued in place but once it’s all painted and securely fitted I think they’ll look very good.

HO RT-624 - Brass Test Fit 13

I now have a few small details I want to tidy up on the 3D printed shell but it’s almost finished. Next Monday I’ll release the model in two versions. The PPR early version with the Trainphone and the later without. There will also be one extra RT-624 for the single Minneapolis Northfield & Southern locomotive numbered Twenty Five.