In my post, two weeks ago, I said that the HO D6-6-2000 project was just about ready and I was just waiting for the etched brass to arrive so I could do a test fit. Then it would be released last week. Well as you may have gathered from the last week’s absent post there was a little more work required before I could release the models. But they’re now ready.
The etched brass arrived and looks very nice. It’s much thicker than my normal N Scale etches, and this gives it a sturdy feel.
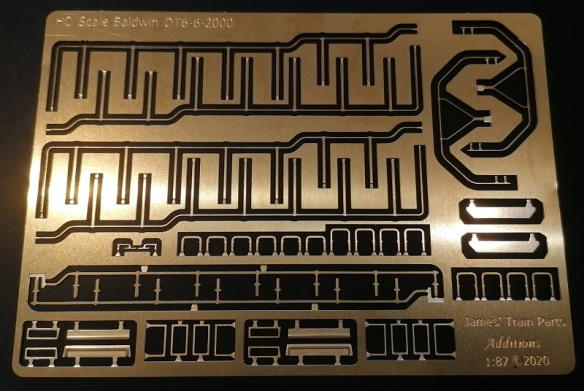
However, because it’s thicker there was an added complication I didn’t foresee. To etch the metal, it’s done in two halves. The front is half etched, then the back. Any areas which are etched from both sides will form a hole. All etching will have a rounding to the etched side, and the thicker the metal, the larger the rounding. Normally for my thinner N Scale etches this has been insignificant, but for HO this means all the handrail and grab iron posts that fit into the 3D printed holes, didn’t fit as smoothly as designed, causing the etched parts to bend if forced in.
This is easily overcome by increasing the square hole size in the 3D printed model. The larger hole won’t be visible once the brass is fitted, but it will make the fitting much easier. For my test print, I’ll need to drill the holes to fit the brass parts and I haven’t gotten to that yet.
As I was making these modifications to the 3D model I also took the chance to make some other improvements. The side handrails, as shown below, fit into a hole next to the cab door and two holes in the raised deck. But alongside the lower deck, they were originally located by a small vertical block that represented the handrail fixing, but this didn’t set any height. So I have made the block an ‘L’ shape so the brass can be set in the correct position and ensure the handrail is level. This will greatly improve the installation of the handrails.

Also in the image above you may have noticed I added the detail for the structural section which sits directly over the truck bolster. This was missing on my N scale version.
Under the coupling in the pilot, there should also be a triangular-shaped section. Looking through the photos I have of the originals it wasn’t always present. I guess it was removable and not always replaced. I’ve made this a separate part that can be attached to the Kadee coupling box if required.

So now I know all the parts work it’s time to let you know what you need.
To start you’re going to need a Bowser (Stewart) chassis from an Alco C628 or C-630.
The chassis looks like this:
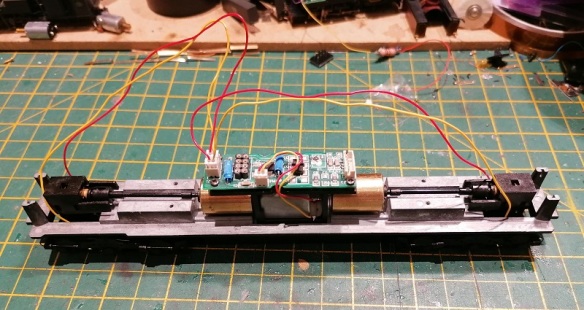
Other chassis can be used if the mounting points and truck spacing are the same. As shown below the chassis has a mounting point at each end. The distance between the hole centers is 217.2mm (8.551″).

The chassis comes with different trucks depending on the loco model.
The C-628 should come with ALCo Trimout trucks which are what you need as a starting point. The C-630 comes with ALCo Trimout trucks or High-Adhesion trucks; both have the gears required, but the base plate from the High-Adhesion trucks is shorter and won’t fit the DT6-6-2000 trucks. But with a bit of modification, it can be made to fit. (I’ll cover that in a later post).
Although the Baldwin RT-624 and possibly some later DT-6-6-2000 had trucks very similar to the Trimout trucks, the bulk of the DT6-6-2000s had Commonwealth trucks, so you’ll also need to get a set of the Bowser side frames. I recommend the Bowser kit 96-603; it can also be used to upgrade an older Stewart Chassis to better pickup if that’s the one you have. It can be found at the bottom right of Bowser page using the link below
https://www.bowser-trains.com/instructions.html
If these become hard to get let me know, I can make a 3D printed set of side frames available.
To convert the Bowser Trimout or High-Adhesion trucks to Commonwealth, you’ll need my conversion kit which contains four truck center halves and 8 gears and can be ordered from Shapeways using the link below.
https://www.shapeways.com/product/5XK97PV2H/baldwin-dt6-6-2000-ho-truck-parts
Next, I’ve made the small parts as a separate model; this was the only solution to getting them to 3D print properly. This model contains the crew and cabs, horns, and triangular pilot blocks I spoke about earlier. This can be ordered from Shapeways using the link below.
https://www.shapeways.com/product/EKW9D3ENC/baldwin-dt6-6-2000-ho-parts
All the brass is on one fret and is ordered directly from me at a cost of £10 GBP each plus postage. Please contact me directly for these. I’ll add a page to the website soon.
The couplings for this locomotive has been designed as Kadee #148 HO Scale 140-Series Whisker® Metal Couplers with Gearboxes – Universal – Medium (9/32″) Centerset Shank.
https://www.kadee.com/ho-scale-couplers-c-274_276_284/148-ho-scale-140series-whisker-metal-couplers-with-gearboxes-universal-medium-932-centerset-shank-p-298.htm
To make the couplings powered you’ll need the Precimodels kit.
https://www.precimodels.com/en/
Lastly, you’ll need the shell. So far I have three different versions available.
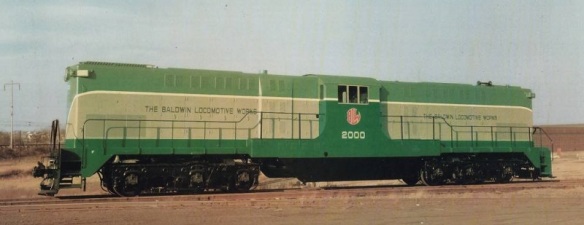
Baldwin DT6-6-2000 HO Type 1 has no window shades or frames and the horns are further forward in the roof. This is to model the Baldwin demonstrator, No, 2000. (A Baldwin Locomotive Works builder’s photo https://www.american-rails.com/20001.html)
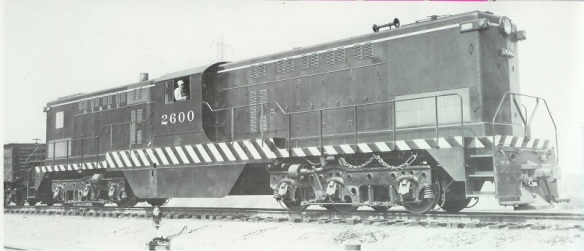
ATSF 2600 before any rework. (Uncredited image – it was in a magazine but I have no idea which one, so if you know where this image originates from please drop me a message).
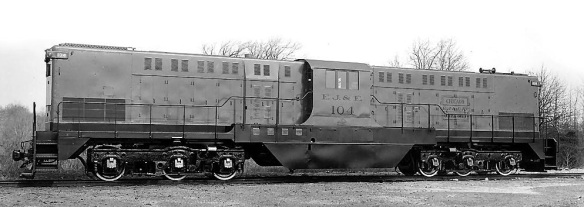
Elgin, Joliet, and Eastern Railway early DT6-6-2000s such as no, 104 shown below. (Uncredited image – If you know where this image originates from please drop me a message).
My Baldwin DT6-6-2000 HO Type 1 can be ordered from Shapeways using the link below.
https://www.shapeways.com/product/9PB8YPQAM/baldwin-dt6-6-2000-ho-type-1
The Baldwin DT6-6-2000 HO Type 2 has slots above the windows for the brass sunshades and the horns have been moved back closer to the cab. This is to model the early ATSF locos such as 2601 & 2602. I think it’ll also work for some of the EJ&ER locos.

My Baldwin DT6-6-2000 HO Type 2 can be ordered from Shapeways using the link below.
https://www.shapeways.com/product/ES5Y6AH27/baldwin-dt6-6-2000-ho-type-2
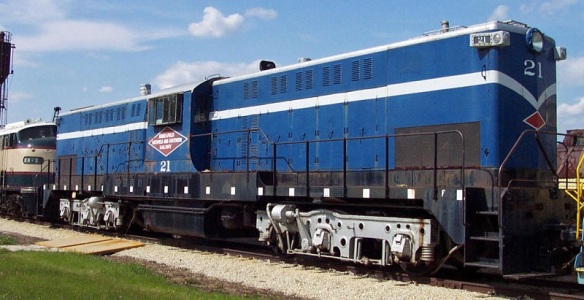
The Baldwin DT6-6-2000 HO Type 3 has slots around the windows for the brass window box and the horns have been moved back closer to the cab. The side plates under the cab have also been removed.
This is to model The Minneapolis, Northfield, and Southern Railway no 21. (Picture from Illinois Railway Museum http://www.railroadmichigan.com/illinoisrailwaymuseum.html)
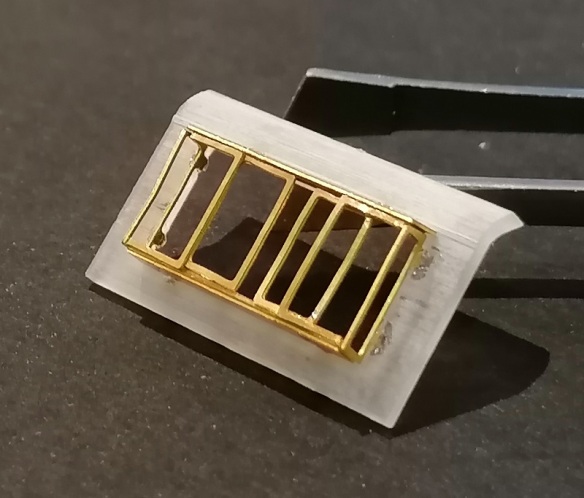
The window box looks like this, I’ll do a post later to show how it fixes together.
Because the side plates have been cut back you will be able to see the model chassis. I’ll look at making a fuel tank section to cover this at a later date, this will also be used for the RT-624.
My Baldwin DT6-6-2000 HO Type 3 can be ordered from Shapeways using the link below.
https://www.shapeways.com/product/XUCQYADSG/baldwin-dt6-6-2000-ho-type-3
There’ll be more shells coming over the next few weeks to cover:
The Trona Railway locomotives.
The Peabody Coal Railroad’s locomotives.
The Soo Line Railroad locomotives.
If you have a need for a DT6-6-2000 shell that I haven’t covered please get in touch via the contacts page.

 To enjoy the savings all you need to do is enter the code CYBER2020 at the checkout.
 However, there’s a risk of damaging or bending the parts as the pressure needed to cut the metal is more than the force needed to bend the parts, particularly with tiny parts. Stainless steel etches are harder to cut than brass etches, because the material is harder. This is more noticeable especially on a metal or hard surface, and you may struggle to cut the etch at all. If you cut either material etch on a cutting mat the blade will drag the part down as you exert the force needed to cut through, resulting in bending the part. The stainless etch below has some very small parts, the squares on the cutting mat are 0.5″ (12.5mm).


 To make this design work the shell has a different window configuration, with slots to receive the etched brass on all sides and nothing in the middle.


You must be logged in to post a comment.