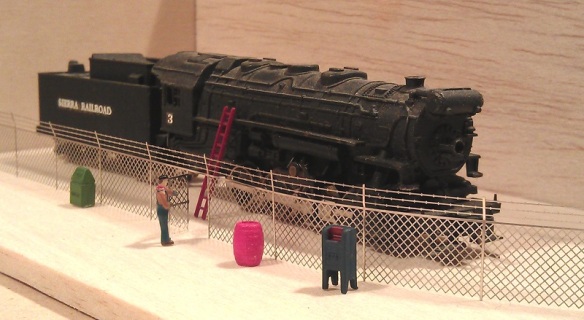
New Pages in the Shop – Etched Metal Additions

When I first set up this blog/website all of the models I offered came from my Shapeways shop and the few etched brass Additions that went with those models were only available on request.

I now offer several etched metal Additions for my own locomotive shells and there are more on the way.  I will soon be offering etched metal Additions for other models as well as my own.  To start with these will include handrails and details for early Atlas N Scale EMD GP7/9 locomotives and handrails and details for Con-Cor’s N Scale U50s.  I am now also producing other etched metal Additions such as my Chain Link Fence which you can read about here.  This fence is also on the cards to be produced in HO Scale.

Because all of these items are not made to order, as with 3D printed items, I have started to build up a stock and I have added a section to my shop on this site so you can buy them directly.  If you click on the shop tab at the top of the page you can navigate through to the relevant sections.

As more etched products are developed I will add them to the shop.  The N Scale Chain Link Fence is due to be added next week.

The ‘Buy Now’ buttons link directly to a PayPal checkout page where you can adjust the quantity if you want more than one. You can then pay with a PayPal account or if you prefer directly with a credit or debit card.

I always intend to keep some in stock, however now and again I may run out but it only takes one week to replenish from my etching manufacturer.

I have also added this same function to the Short Rapido Couplings as it is cheaper for me to print them in bulk, passing the saving on to you.  They will be available in packs of 20, ideal for a HST set, for £5.00 GBP plus postage.

If there is a specific item that you would like etched, such as handrails to replace oversized ones on a locomotive, then please let me know.  I am always happy to discuss new projects.  You can contact me through the contact page or directly at jamestrainparts@yahoo.co.uk.

3D Printing in Extreme High Definition for All – from Shapeways

In January of this year I shared with you some 3D printed locomotive shells that had been printed in Extreme High Definition by a firm in London, England called Impossible Creations Ltd.  You can find the post here.  Since then other companies have been branching out into higher definition printing as the demand for better quality prints has been rising.  Shapeways have now entered this market with their new Frosted Extreme Detail plastics.

Shapeways-fxd-email-hero-625x468

The image above is from Shapeways’ launch blog post on their website. (That is not my finger.)

Frosted Extreme Detail or FXD is basically the same as the Extreme High Definition I have already used from Impossible Creations. It is printed in the same type of printer made by 3D Systems.  The only difference is the material. Impossible Creations use VisiJet M3 Procast which is a blue material, originally designed to be used in a lost cast process to manufacture jewelry from 3D printed models.  Shapeways use VisiJet M3 Crystal which is the translucent material we all know as Frosted Detail and Frosted Ultra Detail.

FXD has a much smaller layer thickness than FD or FUD, the thickness is measured in Microns and the thinner the layer the higher the definition or resolution.

FD prints at 32 Microns

FUD prints at 29 Micros

FXD prints at 16 Micros

Shapeways have set their parameters for printing in FXD to the same level as FUD; with the exception of the boundary box.  The boundary box is the overall size of model which you can print and they have done this for a very simple reason; time.  They have set the size to 50mm by 50mm by 200mm,  200mm being the hight.  If this space is full at a 16 micron layer thickness it will take 48 hours to print.  If they had set it to 200mm by 200mm by 200mm it would take 192 hours or 8 days!  Keeping the time down keeps this material cost effective.

Fortunately for a lot of my models this is not to much of an issue as most will fit, well maybe not the O Scale stuff!  The majority of my models have already been switched over so they are now available in both FUD & FXD.  One of the nice things about this, apart from the better quality, is the price.  Although the FXD costs more per cubic centimeter the base price is still the same.  Shapeways are charging a $5 fixed fee per model, as they do with FUD, plus the material costs.  So small models like my N Scale Three Chime Horns, as pictured below, are only $0.50 more expensive for a much higher quality in FXD.

Horns 3

Larger models like locomotive shells will end up costing a bit more.  For example my N Scale Baldwin RT-624, as pictured below, in FUD costs $55.  In FXD it costs $80.22. That may sound like quite a hike in price but when compared to other companies offering the same lelvel of high quality printing the price rise is actually minimal. (Please note the actual price varies depending on your country, taxes and currency exchange rate).

Baldwin RT-624 Render 3

A few of my models are still being converted, such as the big EMD DD35 so they are not available in FXD just yet. But it won’t be long.  If there’s a model that you would like in FXD and it is not yet available please contact me through the Contact Page or drop me an email at jamestrainparts@yahoo.co.uk and I can either make it available or let you know when it will be.

One downside to this exciting news is that Shapeways will no longer be offering models in their FD material.  This is because FD requires a lot more support material, which is as expensive as the main material.   So in order to make it cost effective they need to raise the price; however this will make it the same price as FUD which is a higher resolution material and therefore FD will become redundant.

This is a shame because FD was beneficial to large-scale models such as my O Scale UP Tender.  At such a large-scale the cost difference between FD and FUD was a lot. These are definitely too big for FXD.  However Shapeways will be continuing to offer FD untill the 29th of April 2015.  I know that is not long but you can still order the FD O Scale tenders untill then.

Another bit of good news, Shapeways are offering 10% off all orders untill the 23rd of April 2015 with the discount code ‘THANKYOU10‘.

All of my new models will also be available in FXD including the big Alco C-855 which will be making an appearance soon.  I will also be making my own orders in the FXD and I will be sharing them with you, that’s if you don’t beat me to it using the discount code.

N Scale Etched Chain Link Fencing – With An Intoductory Offer

A few fellow modellers and I are building some new N Scale modules for our Solent Summit modular layout. Several of these modules will require chain link fences and a discussion about what to use led me to produce my own N Scale etched chain link fencing products.

*These will be available for regular purchase in two weeks but I have an introductory offer for this product available this week only. Please see the end of the post for details.*

For the modules we are building there are three main types of chain link fence needed. Type 1 is a basic straight 10 foot long and 6 foot high section with 3 lines of barbed wire on top. Type 2 is the same panel as Type 1 but includes a small personnel gate. Type 3 is a large pair of access gates, again with the barbed wire on top. A 4th type was also discussed that did not have the barbed wire on top but it was decided that the existing barbed wire could easily be cut off.

The fence style is a typical configuration for chain link fences; tubular post and top cross rails for support and close pattern mesh. Here is a link to a typical example, and another here. Both from United Fence of Hattiesburg.

As always with my designs the process starts with 3D drawing or modelling, in this case it was a simple matter of drawing the different sections of fence as you can see below. The first and third sections from the left are standard panels. The second has the personnel door. The forth and seventh section include a diagonal brace to support the gate post. And the fifth and sixth sections are the actual gates giving a 20 foot opening.

Chain Link Fence Render

Although 3D printing is suitable for constructing modelling components, for this fencing I am using metal etching. This has many advantages; etched metal components are strong and can be very thin. As this fencing is for N Scale at 1:160 the actual chain links will need to be thin to be believable. Although most of my etched metal parts to date have been made from brass the fencing will be made from stainless steel. Firstly this is because it will already be the right colour and will not need any painting. Secondly stainless steel is a lot stronger than brass. This means the base metal can be a lot thinner without losing its strength. Using this to my advantage I have been able to select a very thin metal, 5 thou thick, and also half etch the actual chain link section. This means the fence part is only 2.5 thou thick and appears to run behind the post just like the original.

With the design agreed upon the sections of fencing were laid out in a practical configuration. This took the form of a one hundred foot length of fencing. Each length will be in its own etched fret. A fret is an etched section of metal that has the final part and its supporting frame. Three different styles of fret make up one sheet as you can see below. The first six frets are all Type 1 fencing consisting of ten regular panels. The next three frets are Type 2 which is also ten regular panels but every fifth panel has a personnel gate. The last two frets are the Type 3 with two sets of large access gates and two regular panels making up the one hundred foot of fencing.

Chin Link Fence Blog Post 1

In total a whole sheet has 1100 foot of fencing on it. To show you how easy the fencing is to work with I have cut a Type 2 fret out of this sheet as you can see below. This is how a fret will normally be delivered unless you buy a whole sheet.

Chin Link Fence Blog Post 2

Zooming in closer you can see that the chain link is thinner than the posts.

Chin Link Fence Blog Post 3

The one hundred foot fence is fixed into the fret at six points with tabs; you can see two on the left of the photo above. These have been half etched where the tab connects to the fence so they can easily be cut with a craft knife.

The personnel gates have three hinges on one side and a lock on the other also represented by a half etched section.

Chin Link Fence Blog Post 4

To give you an idea of the size of the fret; here it is alongside a 4-8-2 steam locomotive.

Chin Link Fence Blog Post 8

Cutting the fence from the fret simply requires six cuts with a craft knife through the tabs as mentioned above. As you can see in the image below each post protrudes down past the bottom of the chain links. This is to allow a good fixing into your layout.

Chin Link Fence Blog Post 9

To help position the fencing I have included holes along the top of the fret which line up with the post. I have used a standard sewing needle to position the first post hole as shown below.

Chin Link Fence Blog Post 10

Then, without removing the needle, I used a second needle to mark out the other holes. Keeping the first needle in the base board stops the fret from sliding and losing its position. If your base board is made from a very hard material a small drill can also be used.

Chin Link Fence Blog Post 11

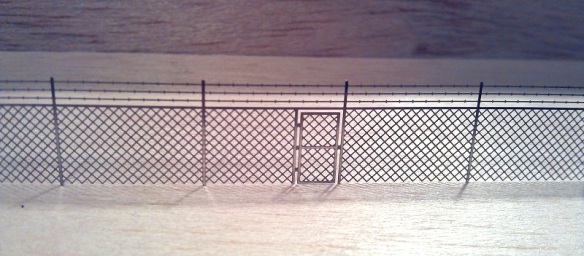
Once all the holes have been marked I removed the fret and increased the holes slightly by pushing the needle in a bit further. Then I simply offered the fence section up to the holes and starting at one end lowered the posts into the holes.
Chin Link Fence Blog Post 12

The fence is very stable and, assuming the holes are deep enough, the mesh will rest on the ground. Below is the installed fence again with big 4-8-2 behind it.

Chin Link Fence Blog Post 13

The steam locomotive is quite large so to show you that the fence is the correct size, below is a shot with the fence and an N Scale X-Act ruler. The top bar of the fence is six feet high and the barbed wire post project up another two feet.

Chin Link Fence Blog Post 14

As I said before the personnel gates and large accesses gates have half etched hinges and locks. The locks can easily be cut with your craft knife and the gates can be opened as shown below,

Chin Link Fence Blog Post 15 Chin Link Fence Blog Post 16 Chin Link Fence Blog Post 17 Chin Link Fence Blog Post 18 Chin Link Fence Blog Post 19

Quite often the barbwire sections at the top of these fences are bent over at an angle; this can easily be replicated. I used a pair of flat end tweezers to bend each post top over and the barbwire went with them.

Chin Link Fence Blog Post 20 Chin Link Fence Blog Post 21 Chin Link Fence Blog Post 22 Chin Link Fence Blog Post 23 Chin Link Fence Blog Post 24

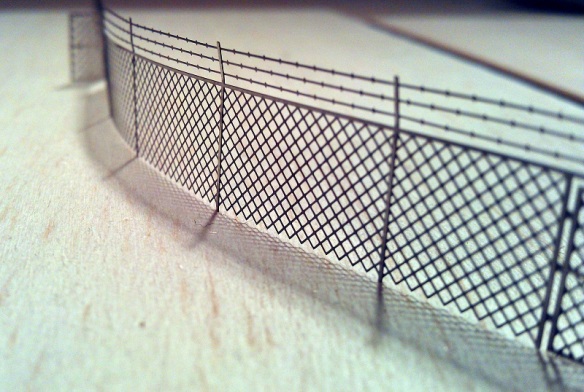
Not all fences are straight so using the holes on the fret again I put a needle into the last hole on the straight line then rotated the fret around it. I then marked the next hole.

Chin Link Fence Blog Post 25

Leapfrogging the needles and rotating the fret each time will give a curve with correctly spaced post holes.

Chin Link Fence Blog Post 26

The fence section then drops back into the holes.

Chin Link Fence Blog Post 27

The fence is surprisingly strong which will help in the event it is knocked on the layout. Below is a photo showing a Micro-trains coupling checker block resting on the fence. The block is quite heavy, for N scale, and only the barbwire flexed a bit, the fencing didn’t move.  Even when the stainless steel fencing is loose it is still considerably stronger than brass.  Also unlike details like handrails the mesh structure is a strong pattern even though its is thin.

Chin Link Fence Blog Post 28

It is very easy to see how quickly a scene can be made with this fencing.

Chin Link Fence Blog Post 29 Chin Link Fence Blog Post 30 Chin Link Fence Blog Post 31 Chin Link Fence Blog Post 32 Chin Link Fence Blog Post 33 Chin Link Fence Blog Post 34 Chin Link Fence Blog Post 35

The large access gates are installed in the same way except there is no post between the gates.

Chin Link Fence Blog Post 37

As well as using these fences on our modules I am also going to make them available to buy. Please note that the £ to $ conversion rate is subject to change, and the base currency is £ GBP.

Typically each fret, 100 foot of fencing will cost £4.00 GBP ($5.90 USD) plus P&P.

However as this is a new product I will be offering it at an introductory price £3.00 GBP ($4.50 USD) plus P&P per fret or £30.00 GBP ($44.00 USD) plus P&P for a whole sheet, 1100 feet of fencing.

This offer is only available until 22.00 EST on Sunday the 19th April 2015.

I will be ordering my stock on the 20th of April 2015 and will be shipping orders out on or before the following week.
Chin Link Fence Blog Post 36

Please contact me though the contact page or directly at jamestrainparts@yahoo.co.uk if you are interested in any chain link fencing and I can confirm P&P and details.

Next week I will be sharing with you some more development with 3D printing and some advancements in higher quality 3D printing.

Adding Lights to a HO Scale Union Pacific Water Tender Part 3

In last week’s post I shared with you my work on adding working headlights to a set of my HO UP tenders; you can find the post here.  For this week’s post I will share with you how I completed the project.

Having already constructed the power pickup assemblys and installed the DCC decoders the last thing to do was to install the headlights.  For this I used headlights from a Bachmann 2-8-4 Berkshire locomotive. These, when in stock, can be obtained from Bachmann as spare parts.  They come as part of the smoke box door assembly as shown below.

HO Tender Headight 1

The headlamp is an injection molded part with a clear plastic lens that fills the headlight and runs out the back as shown below.   The lens tail has been painted black to prevent light from spilling out sideways.  With the 2-8-4 locomotive the light is inside the boiler and travels through the lens tail to the headlamp.  I intend to do the same thing.

HO Tender Headight 2

First I need to spray the plastic part with UP Harbour Mist Gray; I removed the lens to do this.HO Tender Headight 3

As I mentioned in last week’s post; I didn’t want to install the headlights untill all painting and decal work was complete.  This has now been done and the tenders are ready for their headlights.  The lamp assembly consists of the parts as shown below; the lighthouse LED with its resistor, a joiner and the headlight.  For the joiner I have used a section of plastic insulation cut from a mains electrical cable.  The inside diameter is the same as the LED and headlight lens tail so they all push fit together well.  With the parts assembled I painted the visible bits of the LED with black paint to minimise and light from inside the tender.

HO Tender Headight 4

A hole in the shell needs to be drilled just above the headlight support bracket for the lens tail to stick though; then the headlight can be glued in place.

HO Tender Headight 5 HO Tender Headight 6

Fitting the LED & joiner to the back of the lens tail inside the tender was a bit awkward to do as my hand fills the avalable space.  This also made it impossible to photograph.  However I achieved it by powering up the LED, which not only checked to make sure it was pointing straight through the joiner but also helped me see what I was doing.  Once it was aligned I pushed the joiner over the lens tail and glued the whole assembly to the roof of the tender.  Then the tenders could be fitted to the chassis and a test of the headlights could be done.

HO Tender Headight 7

Both headlights are bright but with a warm glow.  On DCC power they could be turned on and off with the F1 function.  And with a flick of the switch on the underside of the chassis they become DC powered and function like ordinary directional headlights.

The final stage was to add the rest of the details such as the roof top tool boxes and ladders.

HO Tender Headight 8

These tenders also need coupling to be completed and then they will be ready for service.

The Backmann headlights worked well but I would prefer to develop my own for use on other projects.  Having the lens carry the light from inside the tender seems to be a good idea for this so I will experiment with 3D printing the headlight and running a fiber optic cable from the back into the tender for the next set.  I will share this with you when when its done.